Everyone’s always telling you what not to do with your finances. Don’t use payday loans. Don’t buy coffee. Don’t pay the minimum on your credit cards.
1. Check your account everyday. Before you start your work at the office, open up your online bank account and look at it. It is impossible to stick your head in the sand if you are forced to look at your finances everyday.
2. Make your coffee at home. Invest in a coffee maker on a timer and some travel mugs.
3. Keep your receipts. Make a weekly envelope and keep the receipts for everything you purchase. Not only will this force you to notice your spending habits, but it’s a great place to hang on to receipts for refunds.
4. Take your lunch to work. Make your lunch the night before or right when you cook, section some out in a little container for lunch tomorrow. If you get lonely, get a buddy to do it with you. Create a critical mass and you’ll have all of your office friends taking lunch to work.
5. Make one ATM withdrawal (at your bank ATM) once a week. Do it on Monday and swear not to get more money out. Even take your ATM card out of your wallet. You won’t be tempted to use it when you’re running low, and you’ll be reminded what money spent really looks like. Also, you get rid of those nasty out of bank fees.
6. Put your credit cards in a sealed envelope and hide them. I’ve heard about freezing them, so that you can’t use them unless you melt them out. It’s a great idea because you have them in case of an emergency, but can’t use them when it’s not. If you can, define the emergency you may need them for. Write them on the envelope. Try to think of some ways ahead of time to solve these financial crises without using the credit card and prepare for them. Example: Your car may break down. Create a car fund of $300 in a separate bank account. Ignore it, leave it, forget the account number but know that it’s there (collecting money) to get you over the worst of the hump.
7. Go to AA. No it isn’t for the free donuts. Alcohol is the most expensive and flexible expense you have. If you can, stop drinking. Or bring $20 and leave your cards at home. You won’t be tempted when you’re most susceptible to over spend.
Saturday, March 15, 2008


Tuesday, March 11, 2008
Solving Clutter Problems
Today’s blog is a practical exercise in solving clutter problems. Your house may be clean, but if you have a few random things lying around on every surface, it doesn’t look clean. People often ignore things lying around because they don’t have a place for them or aren’t sure what to do with them.
Step 1: Clear off a large space to put all of your clutter. Pull out the trash can, get a bag for donations, a laundry basket, and get a box for miscellaneous items. Set out the trash bags and plastic bags.
Step 2: Walk around your home and pick up the little bits of clutter lying around. Set it all on a table or in one location in the middle of the floor. Mail, lotions, clothes, random projects are all lying around my place.
Step 3: Start piling like things together. Make a pile for dirty laundry, or for trash, one for items to donate. If you have random things, make a pile for each room and even each area they go in. Create a pile for things you have no idea where they should go.
Step 4: Once you have sorted everything, put the groups of items away in each room one at a time. Take out the trash, put the donation items in the car.
Step 5: Take a look at the miscellaneous items you can’t find a home for. Determine if you really need them in the first place. Maybe you don’t need 18 Yankee Candles out at a time and you can put some in a space the cupboard. If you need a break, put the miscellaneous items in a box, just don’t leave everything out indefinitely.
Step 6: Schedule a time to sort through the miscellaneous box. Schedule a time to deliver donations if you cannot deliver them immediately. Do not shove it in the corner. On your appointment time, go through the miscellaneous box. Don’t be afraid to throw away things if you find you really don’t use or need them.
Wednesday, March 05, 2008
15 Reasons You should wait go to Graduate School
1. You are already in debt. So you’re in debt from undergrad, students loans, private loans, and particularly credit card bills, and you want to go to Graduate School. While you can get a deferment for the student loans, you will still have to pay them some day, and they will be worse once you’ve graduated from Graduate School. Take the time and at least get those credit cards taken care of. You won’t be able to afford the payments while you are in school.
2. You’ve never worked in your field. You think you want to be an archeologist, but you’ve never been on a dig. Well then you don’t really know if you can hack it or if you even like it. You need to get to know what you’re going to be doing so you can find out if all the work is really worth it. This shouldn’t be a random day dream but something you KNOW you want. Experience is VITAL in graduate school. The people with more experience get the best projects and positions and have more to talk about in class. If you can’t find a paying job in your field, try to job shadow or volunteer if you can afford it.
3. You want to meet someone. You graduated from college and suddenly it’s impossible to meet anyone new. You miss the constant mixers and the intra-gender library bonding/flirting. Grad school is significantly more expensive than e-harmony. If you want a college atmosphere, get a job in a college town, in the university if you can. The coffee shops and bars will be teaming with grad students anyway. Besides, what happens when you meet someone in grad School and then get successful new jobs…on opposite sides of the country.
4. You want to write. There are thousands of students pouring into creative writing and English programs hoping to be novelists, even though most experts advise against this. Instead think about working joining a writing group for a year, getting together a portfolio and maybe some printed work. You will get to write what you love, instead of a dissertation on the gender implications of Jack and Jill going up a hill.
5. You STILL don’t know what you want to do with your life. If you’ve graduated college still don’t know what you want to be when you grow up, first of all don’t feel too bad. (If you went to a Liberal Arts School like I did, I’m impressed you managed to choose a major.) There are better ways to figure it out than spending massive amounts of time and money on another degree that might not help you anyway. Take a year off and try a few temporary jobs, if you have the money, travel. Dropping out after a semester of grad school is a huge waste of time and money. Don’t stress out, a lot of us are still figuring it out.
6. You can’t find a decent job. A graduate degree isn’t a golden ticket. You still don’t have any real life experience. And the job market may actually be worse when you graduate and you will have even more debt to pay off on your measly still starting salary.
7. You don’t have the proper Language Skills
8. You just want a degree. You want that extra piece of paper. You don’t care what field it’s in and you haven’t thought what you’ll do with it. A Graduate Degree is not an End in and of itself. It is a Means to an End. If you really need a title, call yourself Master of the Universe.
9. You have no savings. You must, I repeat MUST have some savings before you try to go to graduate school. It should be at least enough for you to be able to live on for at least year. Most of the time you can get another job while you are going to school, but if you think you’ll be able to totally support yourself without credit cards or loans you are mistaken. The last thing you want to do is miss out on projects or networking opportunities because you have to deliver pizzas after class. Your grades and your work will suffer and the debt you will have after will be astonishing. Figure out the cost of living at the place you want to go to. Overestimate. You may be able to make a little money on the side, and you can probably use some loans, but don’t cripple yourself before you even start your career.
10. Someone told you to. You’re getting too old to do what others tell you to do. If you’re not mature enough to assert yourself, you’re not mature enough to go to Graduate School.
11. You want to do some extensive traveling. Do you seriously think you will be able to afford travel after pouring tens of thousands of dollars in to a degree? Do you think you’ll have the energy to do it?
12. If you wait someone might help you pay for it. A lot of companies are now offering to help pay at least part of the cost of getting another degree. Most of the time this has to relate to your position, but many times you can get some partially relevant classes. Just make sure that what you do will transfer when you do choose to go to school.
13. You still drink like you are and extra in the movie Animal House
14. You don’t think that you will never go back if you don’t do it now. I heard this one a lot when I was deciding on graduate school and I soon learned it is not true at all. You may not want to wait till you have a mortgage and a little of children, but I was the youngest in my program at the age of 23. Plenty of people go back, and it is actually easier for them.
15. You’re afraid of going into the real world. There are much cheaper ways to stick your head in the sand, and if you get a degree you don’t need or want, you might as well have spent the time working at a pool side bar for a year or two.
2. You’ve never worked in your field. You think you want to be an archeologist, but you’ve never been on a dig. Well then you don’t really know if you can hack it or if you even like it. You need to get to know what you’re going to be doing so you can find out if all the work is really worth it. This shouldn’t be a random day dream but something you KNOW you want. Experience is VITAL in graduate school. The people with more experience get the best projects and positions and have more to talk about in class. If you can’t find a paying job in your field, try to job shadow or volunteer if you can afford it.
3. You want to meet someone. You graduated from college and suddenly it’s impossible to meet anyone new. You miss the constant mixers and the intra-gender library bonding/flirting. Grad school is significantly more expensive than e-harmony. If you want a college atmosphere, get a job in a college town, in the university if you can. The coffee shops and bars will be teaming with grad students anyway. Besides, what happens when you meet someone in grad School and then get successful new jobs…on opposite sides of the country.
4. You want to write. There are thousands of students pouring into creative writing and English programs hoping to be novelists, even though most experts advise against this. Instead think about working joining a writing group for a year, getting together a portfolio and maybe some printed work. You will get to write what you love, instead of a dissertation on the gender implications of Jack and Jill going up a hill.
5. You STILL don’t know what you want to do with your life. If you’ve graduated college still don’t know what you want to be when you grow up, first of all don’t feel too bad. (If you went to a Liberal Arts School like I did, I’m impressed you managed to choose a major.) There are better ways to figure it out than spending massive amounts of time and money on another degree that might not help you anyway. Take a year off and try a few temporary jobs, if you have the money, travel. Dropping out after a semester of grad school is a huge waste of time and money. Don’t stress out, a lot of us are still figuring it out.
6. You can’t find a decent job. A graduate degree isn’t a golden ticket. You still don’t have any real life experience. And the job market may actually be worse when you graduate and you will have even more debt to pay off on your measly still starting salary.
7. You don’t have the proper Language Skills
8. You just want a degree. You want that extra piece of paper. You don’t care what field it’s in and you haven’t thought what you’ll do with it. A Graduate Degree is not an End in and of itself. It is a Means to an End. If you really need a title, call yourself Master of the Universe.
9. You have no savings. You must, I repeat MUST have some savings before you try to go to graduate school. It should be at least enough for you to be able to live on for at least year. Most of the time you can get another job while you are going to school, but if you think you’ll be able to totally support yourself without credit cards or loans you are mistaken. The last thing you want to do is miss out on projects or networking opportunities because you have to deliver pizzas after class. Your grades and your work will suffer and the debt you will have after will be astonishing. Figure out the cost of living at the place you want to go to. Overestimate. You may be able to make a little money on the side, and you can probably use some loans, but don’t cripple yourself before you even start your career.
10. Someone told you to. You’re getting too old to do what others tell you to do. If you’re not mature enough to assert yourself, you’re not mature enough to go to Graduate School.
11. You want to do some extensive traveling. Do you seriously think you will be able to afford travel after pouring tens of thousands of dollars in to a degree? Do you think you’ll have the energy to do it?
12. If you wait someone might help you pay for it. A lot of companies are now offering to help pay at least part of the cost of getting another degree. Most of the time this has to relate to your position, but many times you can get some partially relevant classes. Just make sure that what you do will transfer when you do choose to go to school.
13. You still drink like you are and extra in the movie Animal House
14. You don’t think that you will never go back if you don’t do it now. I heard this one a lot when I was deciding on graduate school and I soon learned it is not true at all. You may not want to wait till you have a mortgage and a little of children, but I was the youngest in my program at the age of 23. Plenty of people go back, and it is actually easier for them.
15. You’re afraid of going into the real world. There are much cheaper ways to stick your head in the sand, and if you get a degree you don’t need or want, you might as well have spent the time working at a pool side bar for a year or two.
Monday, March 03, 2008
5 Quickie Dinners made with Tortillas
Making dinner during the week can be difficult. Working takes up enough time, but what if you want to work out or meet with friends. Here are a few ideas for dinners that are quick and easy and are made of ingredients you can easily have on hand.
Chicken Enchiladas
- 1 Brick cream cheese (I use 1/3 fat)
- 1 cup salsa
- 1 can pinto beans, drained
- 8 fajita sized tortillas (I use the whole wheat)
- 1 cup shredded taco cheese
- 1 small onion
- 1 can chopped tomatoes, drained
- 1 can enchilada sauce
- Two cooked Chicken breasts chopped into small pieces * For vegetarian just add another can of drained pinto beans instead
- Cayenne pepper and powdered garlic to taste
Melt the cream cheese and salsa on medium heat. Stir till blended, then add the cooked chicken, drained pinto beans, cayenne pepper, garlic, tomatoes and stir until blended. Fill the tortillas, roll into tubes, and lay side by side in an oven safe/lightly oiled pan. Chop up the onions. Pour sauce over rolled enchiladas. Sprinkle on chopped onions and shredded cheese over the top. Bake at 375 for 30 minutes.
Mexican Pizzas
- 1 Bag tortillas
- 1 can refried beans
- Shredded Cheese
- Salsa
- Chopped Onions
Toast one tortilla spread refried beans and salsa on top. Layer with next tortilla spread onions and green peppers, salsa and then toss shredded cheese. Toast in toaster oven or in oven for 10 minutes at 400 degrees.
Quesadillas
- Tortillas
- Shredded Cheese
- Chopped Onions
- Chopped Green Peppers
- Baby Spinach
- Oil
Toast one tortilla. Layer cheese, and chopped vegetables between two tortillas. In a lightly greased pan toast until light brown and cheese is melted.
Taco Salad
- 1 Can pinto beans
- Salad
- Shredded Cheese
- Salsa
- Tortillas
Make a salad with all of your favorite veggies. Toast a tortilla in a toaster or in the oven. Toss shredded cheese, drained pinto beans, salsa, and crumbled tortilla over the top.
Wraps
- Turkey Swiss, Baby Spinach, and mustard
- Hummus, Green Peppers, Onions and tomatoes
Quickie Tips
- Keep chopped up onions and green pepper on hand for speedy use
- Buy pre-chopped salads/lettuce
- Keep cans of pinto beans and chopped tomatoes on hand
Grocery List
- 1 Bag of Tortillas
- 2 Bags of Shredded Mexican Cheese
- 1 can of Enchilada Sauce
- 2 Can of Tomatoes
- 2 Can of Pinto Beans
- 1 Jar of Salsa
- Baby Spinach
- Lettuce
- Onions
- Green Peppers
- 1 Can of Refried Beans
- Humus
Friday, February 29, 2008
Organizing Your Out of Control Email Inbox
- Do a bulk search on things you know are spam - Did you subscribe to 5 different email lists only to read one of them 1/3 of the time? Get rid of them, they’re only sitting in your inbox taking up space and making you feel guilty for not reading them.
- Unsubscribe - If there is one or more email lists that you have never actually read, find away to unsubscribe to them, or at the least list them as spam and have them automatically filtered out for easy deleting.
- Create folders and file - Here is a list of folders I have, you may want to change them for your needs, but I found just about anything fits into these.
- Read and Respond – Emails that shouldn’t be in my inbox, but I am looking to read some day or I should respond to someone. I like to look through here at least once a week to make sure there isn’t anything I’m slacking on.
- Bills – Bills and payment confirmations.
- Blog Research – I like to keep forwards or websites or list research for my blog here so if I’m ever uninspired I can look in here, you can really create a folder for each topic of research you are interested in.
- Current Projects – Doing research for something new? Try to store it all in one spot.
- Files – I email myself files instead of saving them to a thumbdrive.
- Friends – All of the interesting emails from them, not the ones that are 2 sentences long.
- Job – job search tips, interesting companies, interesting postings (some people toss old postings, but I think that if you were interested in the company once, you should hold on to it and maybe check it out later when you’re more motivated to look for a new job)
- Memberships – emails about password/account information
- Recipes – I love to cook and the lists I’m on send me recipes all the time, I try to hang on to anything I might like.
- Writing – Here is where I keep information from cool writing websites, as well as emails from editors and other writers.
- Yoga_Health – Yoga tips and health articles I might read some day, right after I quit drinking Diet Coke…
- Be realistic about what you can do - I know that I will never have time to read all of the Yoga tips I love, so I have a deadline and if the emails are more than a month old I delete them.
- Email Reminders – I love using email reminders to remind myself to do something or take care of someone’s birthday, however once the event is over, get rid of the reminder.
- Responses don’t have to be perfect– If the email is from my friend and all it requires is a two sentence response, do it while you have it open. By the time you close and and reopen it later you’ve wasted even more time. Don’t make life more complicated than it is.
- Schedule Time on it – Don’t let yourself get bogged down with elaborate organization systems. It should not take you more than 15 minutes to organize your email. Of course it’ll take more time to respond, but budget your time specifically to organize so at least you know what’s going on in your InBox.
Thursday, February 28, 2008
Bento Lunches

Today's post is on two Bentos i made for lunch last week, they aren’t exactly in Bento boxes because I don’t have any big enough right now. The first has a little flower shaped sandwich made out of turkey, lowfat swiss, and BBQ dressing. The flower is nestled in a little flower bed of baby spinach. In the side compartment is a lowfat Baby Bell cheese, heart-shaped picks with baby dill pickles and mandarin oranges. For desert I made a mini vanilla cupcake with multi-colored sprinkles.
 The second Bento has multigrain crackers with a mustard smiley face, egg-salad, laughing cow herb cheese, a Baby Bell cheese, mandarin oranges, and wasabi dried peas. In the side compartment is some Chicken Korma with chopped spinach. Yum!
Sunday, February 17, 2008
Apartment Gardening
 If you are short on space, but still want to be a green thumb, today’s tip should help you out. I’m not ashamed to say it, but I went to Science Camp when I was a kid. I also participated in our school’s science fair every year. One of the classic Science Fair projects is the seedlings in a plastic bag.
 The idea is simple. Buy some seeds, then take a square of paper towel and a clear plastic sandwich bag, and a little water. I love projects that do not require you to purchase any extra supplies! Wet the paper towel and fold it into quarters. Sprinkle the seeds in the middle of the folds and then put the flat wet paper towel in the plastic bag. We always taped the bags to the windows, but I taped mine to my window frames because the screens are in the way. I made sure to label the bags with magic marker so you know what’s growing where. Make sure when you tape the bags up, the window is not too drafty for the young plants.
If you start your seedlings in the next couple of weeks, they should be sturdy and ready for the outside garden in a month or two. This is of course depending on your climate and weather. Buying seeds is much cheaper than purchasing flats of little plants, and gets you in the mood for gardening a little earlier than usual without wasting any space. If you don't have a back yard or a balcony you can always move the plants to a container garden on your window sill.
Above are some pictures of the project. I decided to grow Oregano, Chives and Basil. As you may be able to see, some of the seeds have begun to sprout after only a week!
Wednesday, February 13, 2008
Writing Ideas Journal
 Today’s tip is for all of those aspiring writer’s out there. I constantly hear writers saying “I don’t have anything to write about.” Well I’m here to tell you, that I NEVER have that problem. Aren’t I lucky? Divinely inspired? Nope, I have a system to make sure I never run out of original ideas: an Idea Journal.
 My idea journal is really helpful and simple to create. While I don’t keep it with me everywhere I go, it is in a prominent and convenient place on my desk. Whenever I have an idea, I take an entire page in my journal and write the idea down. Many times it just a cool character or a cool line from one of my friends. When I write the interesting tidbit down, I usually have some inkling of how it may further develop in to a story.
My journal is unlined. Remember this is just a brainstorming phase right now, no need for lines and boxes to keep you down. Once story idea for each page I find works best. I also like to use brightly colored fine pointed sharpies. These usually help me get more excited about the idea. Sometimes there is an interesting article in the news or online and I cut or print them out and save them to glue or tape in my journal.
Anytime I don’t have a particular project in mind, I go back to my journal and pick out an idea I was really interested in. I would have forgotten the idea if I hadn’t written it down so I appreciate having my writing journal.
Tuesday, February 12, 2008
Recycled Coffee Tin Craft Project
Today’s project is pretty simple, but the outcome is very useful and I find it very attractive. I buy all of my coffee at Trader Joes, and in the end, I always end up with these large coffee containers. While, I get the large containers, there are smaller ones too I might experiment with.
Here are some pictures of my new storage containers. They store all of my nail polish and manicure supplies. I hope you enjoy this great recycling and organizing project.

Tuesday, February 05, 2008
How to get LESS Sleep
So everyone's always talking about how people these days need more sleep, and how bad a lack of sleep is for your health, but in reality, Who has time for all that sleep? Here's a list of ways to get less sleep. Also a helpful tip, any time you find one of those sites that tells you how to get that all important sleep, just do the opposite.
 10 Ways to Sleep Less
 10 Ways to Sleep Less
 - Force yourself to sleep in a different place or position every night. Totally confuse your body by falling asleep one night on the couch, one on your bed, another in the arm chair, on the floor with a pillow…
- Exercise late at night. Just when your body thought you were ready for bed, go out and run on the treadmill for 30 minutes. Just make sure that you aren’t doing it at the same time every night so you’re body can’t get into a pattern.
- Nap frequently, but erratically. Allow yourself an hour nap when you get home from work. Make sure it doesn’t last longer, and you’ll be up till 3 easily. If you can get down to 4 hours of sleep a night, one extra hour totals only 5. If you can get a 15 min nap in the afternoon. It’s better to nap a little then be totally unproductive while waiting to be able to go to sleep.
- Break the Routine. Get to know your body’s patterns and make sure you screw them up as much as possible.
- Take your vitamins. An iron deficiency can make you tired. Also the healthier your body is the better you can withstand this sleep loss.
- Cut out the refined flour. These kinds of carbs lead to up and down blood sugar. Stick with whole grains and more protein if at all possible. What you want is a long and steady moderate sleepiness.
- Drink more water. Dehydration leads to fatigue, also you need keep drinking enough water to fight the diuretic effects of number 10.
- Eat little snacks. Low blood sugar can lead to sleepiness. If you start to feel like you’re energy is waning, have a little sack like a handful of dried fruit or a yoghurt.
- Never Turn out the lights. Keep your lights on when you sleep so that your body doesn’t think you should be asleep for the night, with any luck your body won't be abel to tell that it’s night at all.
- COFFEE! Coffee is good, but make sure you have a steady stream to keep the caffeine and a moderate level. What you don’t want to do is down a shot of espresso, bounce off the walls for half an hour, and then pass out in a bush on the walk home from Starbucks. Also better for the slow drip release of caffeine are drinks like diet coke and tea.
*These tips are provided for sarcastic purposes only and are not proven to keep you awake, make you more productive, and will probably decrease your general level of health.
(Photo Courtesy of pbo31)Friday, February 01, 2008
Cover Letter Help
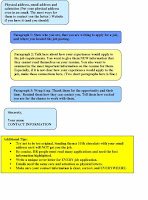
Lately it seems that I have been revising a lot of resumes and cover letters for my friends. It makes sense, because I live in Michigan where everyone is either unemployed or underemployed. I found that I was explaining how to write a cover letter more often that not, so I put together a few really great sites with examples of different types of cover letters. Also, I have a little sheet here that shows how I write cover letters. If you click on it you can see it in detail and print it out.
Since most cover letters are going to be cover emails now a days, I have found some sites that are a little more up to date than other sites. Remember that if you email in your resume to a job, you should treat that email just as you would a physical cover letter.
Sites with different examples of cover letters:
http://jobsearch.about.com/od/coverlettersamples/a/coverlettsample.htm
http://www.quintcareers.com/cover_letter_samples.html
http://www.bestcoverletters.com/
And here's the handout...
Since most cover letters are going to be cover emails now a days, I have found some sites that are a little more up to date than other sites. Remember that if you email in your resume to a job, you should treat that email just as you would a physical cover letter.
Sites with different examples of cover letters:
http://jobsearch.about.com/od/coverlettersamples/a/coverlettsample.htm
http://www.quintcareers.com/cover_letter_samples.html
http://www.bestcoverletters.com/
And here's the handout...

Thursday, January 31, 2008
Bento Lunches
Hello there, the fabulous Stumble Upon has introduced me to yet another hobby I never knew I missed. Bento boxed lunches are easily the cutest culinary habit since the invention of Peeps.
Popular in
I saw all of these and I had to buy a bento box and try it out myself. I’ll admit when I got my box I was shocked at how small it is. I insist on getting a microwavable box even though the traditional way to eat them is at room temperature, because you do not refrigerate them at work or school. (The food safety issues here are obvious.) But my box looked about the size of my fists closed together. I couldn’t imagine how this would fill me, and it doesn’t entirely, but I usually bring something along on the side. I also realized how this could better help me with portion control. Here's a picture of my little Bento Box. Ooooh the cuteness! Oh and it's microwavable.

This bento is not my first, I will try to post that one later, but this is my most recent one. I made a little wrap of spinach, turkey, cheese and humus. Those little balls are wasabi dried green peas. In the top level is a little wedge of Laughing Cow Lite cheese and Triskets.

My first bento was a cheese, onion and green pepper quesadilla cut into little animals using a Noah’s

And here's another attempt , a humus smiley with celery sticks and spaghetti.

Monday, January 28, 2008
Taking notes for a large Research Paper
Writing a large research paper is daunting on the best of days, but staring at a blank page can be intellectually crippling. Even after reading dozens of articles, people will procrastinate to avoid starting the writing process.
Today’s tip avoids this research roadblock completely. When I write my research papers, I almost never have to start with a blank screen because I take notes on my laptop while I’m conducting my research. If you can read papers online, make sure you take notes along the way in a Word document you’ve pulled up along side the articles. Feel free to cut and paste great quotes into your Word doc, just MAKE SURE that you have a system to differentiate between your original thoughts/comments and your direct quotes so you don’t accidentally plagiarize someone’s work.* Also, go ahead and put the full citation information and make each note a footnote ahead of time. This way you will know exactly where you got each quote/argument.
Doing this work ahead of time is a great way to make use of the murky procrastination time. You can “work” on your paper and get some information down, without stressing that all of the arguments are in line.
If you do this you must be ready to cut some arguments out and you should also start to create an outline for the whole thing as you go along. Often research papers, especially in the humanities, start to flesh themselves out, but if you have to write a literature review in and department, this tip should help you.
Software tools can help, like Adobe Acrobat Pro which will let you comment within a PDF, but you still have to cut and paste the notes from several documents into one. Also, helpful are citation management products like EndNote and ProCite, but it is difficult to take actual notes in these too.
I hope this research tip helps you get over the procrastination monster and start writing your research paper with organization and ease.
*You may have to download the newest versions of Adobe Reader to be able to cut and paste from PDF documents. Otherwise using HTML documents when available is advised.
Thursday, January 10, 2008
Get Full Text Articles in Google

Recently, I have heard a lot of frustration with Google returning searches that are full of articles and webpages that most people cannot look at. Here are a few options to
1. You may have access to this article through your school or public library, so contact your local librarian or go to their website, you probably have access to more than you realize.
1. You may have access to this article through your school or public library, so contact your local librarian or go to their website, you probably have access to more than you realize.
2. The second option you have is to go to the Google Advanced Search and select the “Usage Rights” section and change the option to “Free to Use or Share.” (See circle below) This will give you only the articles that have full text. I could not find this option in Google Scholar, however the Advanced Search is usually good enough to locate some great research. If you will look at the picture above, I have circled the drop down menu you will need to use in the Advanced Search tool to find the "Free to Use and Share" files.
Monday, January 07, 2008
Christmas Bread Gifts
Here is the second Holiday Tip that I would like to add, again sorry it’s late, but you can keep it in mind for next year. This is a very flexible idea so you can probably use it sooner.
This year for some of my office mates I made Christmas Focaccia. I case anyone doesn’t know, Focaccia is an Italian bread that is a cross between a thick pizza dough and flat bread. It contains about a gallon of olive oil and you can put any toppings on it that you like. For my Christmas version, I used fresh rosemary needles to emulate pine needles and then I also used onions and Red and Green Peppers. For a little extra flavor I kneeded in garlic powder and dried basil.
There are a number really easy recipes to make Focaccia, and I have included a few below. I also have a recipe that takes half a week to complete, but I wouldn’t recommend that unless you have absolutely nothing better to do.
http://allrecipes.com/Recipe/Easy-Focaccia/Detail.aspx
http://www.foodnetwork.com/food/recipes/recipe/0,,FOOD_9936_309,00.html
Another Lazy Girl Idea is to use frozen bread dough. You can usually get them in packs, and all you have to do is let them thaw in a bag with olive oil overnight. Once it’s thawed, you can just punch it down and add a little more olive oil and let it rise again. It’s a pretty easy idea and the end result is super cute without a lot of work. (But no nice girl would ever admit to using.)
Once the bread is cooled, you can wrap it in Saran Wrap and then I found these cute Christmassy clear plastic wrapping at the Dollar Store and wrapped each loaf with the Christmas wrap so that the recipient can still see the bread below. A great thing to include with the bread would be a nice bottle of flavored olive oil or a jar of bruschetta.
If you want an Easter Focaccia, try some Yellow and Orange Peppers with some nice purple-y Red Onion. Or what about Orange Peppers and Black Olives for Halloween! The possibilities are limited only by the number of Holidays you celebrate.
Thursday, January 03, 2008
Magnet Craft Project
I am very sorry for the delay. Christmas was a very busy time for this girl but I do have a few holiday gift and craft ideas to share. Part of the reason I waited till after Christmas to share these is because I wanted to take some pictures for you to help illustrate my directions. Also, I didn’t want to ruin the surprise for any of my gift recipients.
The first project I will tell you about is an idea that I got from the great craft blog, Not Martha. They are homemade magnet sets made from recycled magazines as well as online Images I located on Google Image search.

The glass balls are actually the marbles that people use to make flower arrangements. They do have some in the mosaic section of the store, but I found these in the flower arranging section which gave me more pieces for less money. Little magnets are also available there in packs of 20 or more. I also did a little spin on the magnet idea and created some pushpins using thumb tacks to glue to the back of the pictures. While Not Martha recommended using a circle stencil to cut out the images, I found that just generally cutting out the images and then gluing down the marbles and then trimming up the edges after the dried to be the best process for me. I feel like this way I got just the right angle from the marbles which were not exactly round in the first place.
I made sets of the magnets of 5-8 that would match each other. Some of the sets I made were,
"Dogwood Blossoms"
“Impressionist Paintings”

“Old Masters Paintings”

“Butterflies and Roses”

"Puppies and Kittens"
 "Colorful Gods”

...and then of course there are my Christmas Images.

Tuesday, November 27, 2007
Holiday Prep Tips
It’s that time of year again! People talk forever about the holidays bringing big bundles of stress along with it, but they don’t have to. I have a few tips for easing the stress and getting things done ahead of time.
- Buy wine in bulk – You know you will be visiting numerous parties and dinners this season, and it isn’t nice to show up empty handed. Just picking up a bottle ahead of time however is a good recipe for a very late arrival, and is sure to add the panic. Go to Trader Joe’s or a similar discount wine store and pick up a whole case to dole out to each host or hostess. Just make sure you don’t dip into them as much as you do the Halloween Candy!
- Buy pre-made cookie dough - If you are making lots of kinds of cookies, try instead to focus on one or two recipes that are your favorites or that you know that you are best at. For the others, like say your basic chocolate chip feel free to buy a big tub and bake those up. There are also some really nice charities selling cookie dough to raise money.
- Get wrapping paper and bags at the dollar store - You will probably be wrapping presents at some point this season. Try to stock up on gift bags and wrapping paper at the dollar store so you’re not running around 20 minutes before your party buying bags. (And paying $4.00 a pop for each.) The dollar stores around me have really cute ones now.
- Schedule Hair and Manicure Appointments - This is their busy season too. You are not Lindsay Lohan and you will not be able to bump someone for her spot.
- Buy a bunch of the same little presents - I like the little tins of hot cocoa from Trader Joes, or if you find cute little candles or little picture frames get a bunch of them. You can even wrap them and hand them out at work. (This relieves the stress of trying to pick out 15 $10.00 gifts for each of your coworkers.)
- Get your car checked out now – Ok so we were supposed to winterize our cars already and I didn’t. Now is a good time to do it since you probably will be driving more than usual and it’s better to have your car all checked out than to get stuck on the road. If you can try to find a mechanic by the mall (Sears is usually a good place especially for tire issues) this way you can do your holiday shopping while you wait.
- Cards – Your sister doesn’t need you to write out your year long saga in her Christmas card. So write up something short and silly and send out the family ones. At least if you run out of time, the important people got something happy from you in the mail.
- Christmas Emails – Do not send a card through one of those
Monday, November 12, 2007
Braclet/Watch Organizer
 Today’s is just a quick entry on organizing jewelry. These tea caddies make excellent bracelet and watch organizers. I purchased this in London and it was full of different kinds of tea bags. Once I used them all, this box got a different life.
Earring Organizer Craft Project
 Today’s blog is about home organization. Ever have a problem organizing your earrings? Prior to making this little homemade organizer, I was constantly loosing at least one member of a pair. Or I damaged intricate and expensive accessories.
This organizer can be made very cheaply. Simply visit your local craft or fabric store. I went to Jo Ann Fabrics for this one. Get the plastic grid that is used for needle point and cross stitch. (It costs less than $.50) Then you can grab a ribbon. (I purchased a bag of scraps for about $1.00)
Cut the grid in half to be more manageable. Then take the piece of ribbon and tie it to the top of the grid in a little loop.
Then you can thread the earrings through the little holes in the grid. Hoops fit easily on the bottom. I only put my dangly big earrings on this one, and put the studs in a box, but the organizer can hold many studs too.
I hope this helps you keep your favorite fun jewelry together and safe. Remember, you can’t wear it if you can’t find it.
http://www.joann.com/joann
Martha Stewart has a really cute version of this on her craft website, with a frame and everything. However, this seems like a lot of work, and I’m not sure about it. I think a great east idea would be to take an empty picture frame and put the grid in, but then you wouldn’t be able to put the hoops on the bottom.
http://www.marthastewart.com/girls-catchall?lnc=ea166c3b5acee010VgnVCM1000003d370a0aRCRD&rsc=photogallery_crafts_organizing-crafts_p4
Space Saving Tip
I live in a small apartment with a very small bathroom. With space at a minimum, I have to be creative about storage. One great idea I’ve had is to store my towels, in a large box I purchased to go under the front hall table. Towels are great for this because they can be rolled and won’t wrinkle in this condition. With an attractive box, you can allow the items to be in full view.
Here’s a picture. I purchased this box at Home Goods for less than $30.

Subscribe to:
Posts (Atom)


